Introduction
Constructing a durable interlock driveway begins with a solid foundation. Proper base preparation is crucial to prevent issues like shifting, settling, and water damage over time. This guide outlines the essential steps to create a long-lasting interlock driveway base. For expert assistance, consider consulting professionals like Capital Asphalt and Interlock, a family-owned business with over 30 years of experience in the Ottawa area. They specialize in proper interlocking stone base preparation, ensuring high-quality results tailored to your needs.
Planning and Design
Before breaking ground, careful planning is essential. Consider the driveway’s dimensions, layout, and anticipated load. Ensure the design includes proper drainage to prevent water accumulation, which can undermine the base’s integrity. Additionally, evaluate the existing landscape and account for any slopes or grade changes. If your property has significant inclines, you may need to incorporate retaining walls or additional drainage measures. Think about the long-term usability of your driveway; a design that allows for easy snow removal, ample parking, and smooth access will add both practical and aesthetic value to your home. Consulting with a professional landscape architect or driveway contractor can help you decide on the best materials and the most efficient layout for your unique circumstances.
Excavation
Start by excavating the designated area to a depth of 12 to 18 inches, depending on soil conditions and expected traffic. Remove all organic material, such as grass and roots, to prevent future settling. Extending the excavation area 6 to 8 inches beyond the planned driveway edges provides additional stability. Keep in mind that accurate excavation is vital for the driveway’s performance and longevity. Utilize proper tools and machinery, such as mini-excavators, to achieve precise depth and to reduce labor time. Pay close attention to the area’s profile; a smooth, evenly graded excavation will ensure that subsequent layers of material remain stable and even. If the area is prone to excess water, you may want to consider installing a French drain or a perforated pipe beneath the sub-base to enhance drainage further.
Sub-Base Installation
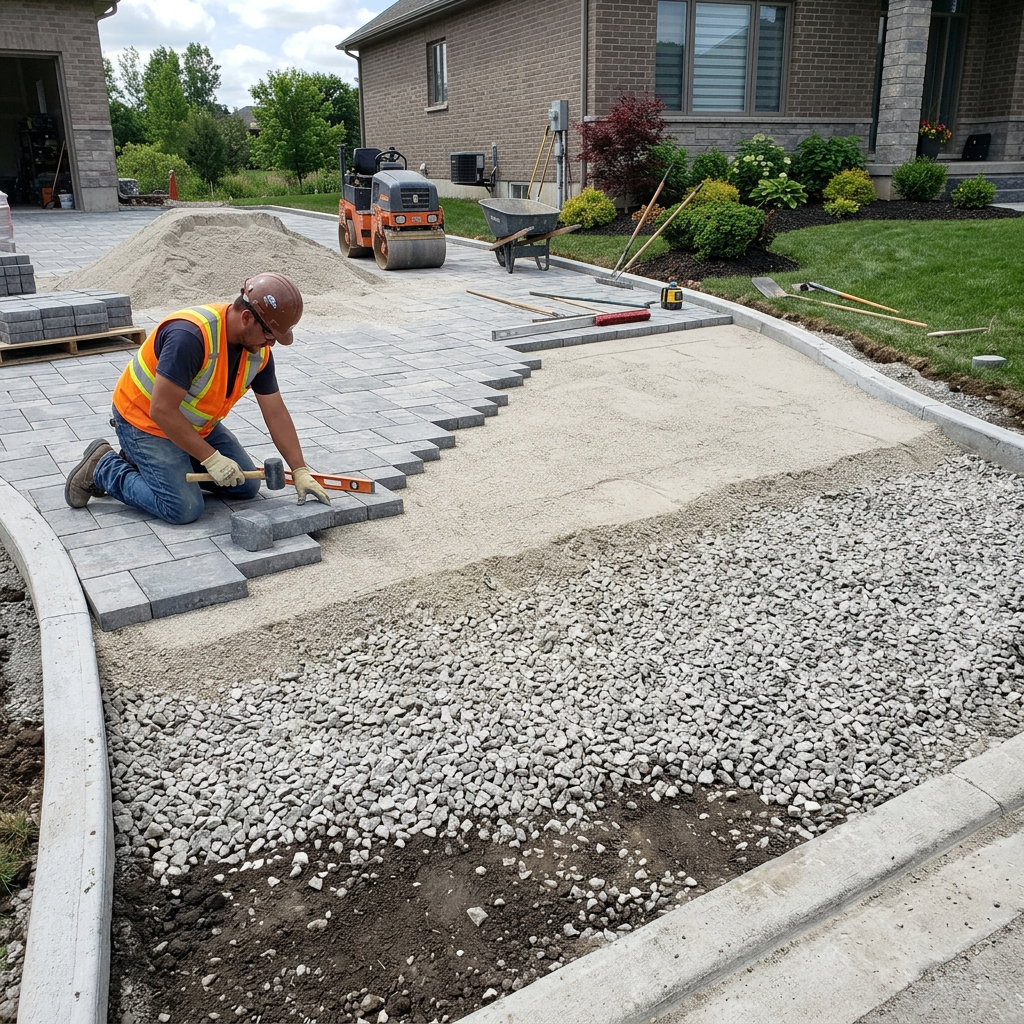
After excavation, lay a geotextile fabric over the soil to separate it from the aggregate layers, preventing mixing and ensuring stability. Next, add a layer of crushed stone or gravel, known as the sub-base, to a depth of 6 to 8 inches. Compact this layer thoroughly using a plate compactor to achieve a solid foundation. The quality of your sub-base will greatly influence the longevity of your driveway. When selecting aggregate for the sub-base, ensure it is free-draining and composed of angular stones, not rounded pebbles. This shape provides optimal interlock and compaction. Compact in thin lifts, typically 2–3 inches at a time, to maximize density and eliminate air pockets. Proper compaction can be checked by walking over the material; if you leave deep impressions, further compaction is required. This stage is essential for preventing future rutting and uneven settling. For driveways that will support heavy vehicles, you might consider increasing the sub-base depth beyond 8 inches for maximum durability.
Bedding Layer
On top of the compacted sub-base, spread a 1-inch layer of coarse sand. This bedding layer allows for minor adjustments and provides a smooth surface for laying the interlocking pavers. Level the sand carefully to maintain uniformity. The bedding layer is not meant for leveling major imperfections; such corrections should be made during the sub-base stage. Instead, the sand serves as a cushion, evenly distributing the weight of cars and other vehicles across the pavers. Screed bars or pipes can be used alongside a long, straight board to ensure the sand layer is uniform and matches the final elevation. Keep in mind that poor preparation of this layer can cause uneven pavers and later maintenance issues. The edges of a high-quality interlock driveway will always appear crisp and uniform thanks to this precise work.
Laying the Pavers
Begin placing the interlocking pavers according to your chosen pattern, starting from one corner and working outward. Maintain consistent spacing and check alignment regularly. Use a rubber mallet to tap the pavers into place gently. Pavers come in a variety of shapes, sizes, and colors. Select a style that complements your home and landscape. Consider patterns such as herringbone, basket-weave, or running bond, each offering a unique look and varying degrees of load distribution. Begin installation at the lowest point of the slope to ensure stability and proper alignment. Working outward reduces the occurrence of large gaps. As you work, occasionally stand back and visually inspect alignment to catch any errors early. If you need to cut pavers to fit edges or curves, use a specialized masonry saw for clean, accurate edges.
Edge Restraints
Install edge restraints along the perimeter to keep the pavers in place and prevent shifting. These can be made of plastic, metal, or concrete and should be securely anchored to the ground.
Edge restraints are sometimes overlooked but play an instrumental role in preserving the integrity of your driveway. Without them, pavers could gradually spread, leading to edge failure and costly repairs. Use spikes or stakes to anchor the restraints into the sub-base, ensuring they stay in position despite seasonal heaving or pressure from vehicle tires. In areas with significant curves or artistic elements, flexible edge restraints offer greater design versatility while still providing strong support.
Final Compaction and Joint Sand
Once all pavers are laid, compact the entire surface with a plate compactor to set the pavers into the bedding layer. Then, sweep fine sand into the joints between pavers to lock them together, enhancing stability and preventing weed growth. Polymeric sand is often preferred for joint filling as it hardens when moistened, helping to prevent the intrusion of weeds and insects. Sweep the sand repeatedly over the pavers, then allow it to settle into the joints using a vibrating plate compactor. Water the surface lightly to set the sand, taking care not to wash it out of the joints. Properly filled joints distribute weight loads and limit water penetration, further extending the life of your driveway.
Sealing and Maintenance
After installation, consider sealing your interlock driveway. Quality sealants provide a water-resistant barrier that helps preserve color and resist staining from oil, dirt, and de-icing salts. Regular maintenance includes sweeping away debris, cleaning up spills, and replenishing joint sand as needed. Annual inspections can catch potential issues, such as settling pavers or shifting edges, before they become larger problems. Prompt repairs and regular upkeep will help your driveway maintain its attractive appearance and functionality for years to come.
Conclusion
Building a long-lasting interlock driveway base requires meticulous planning, proper materials, and careful execution. By following these steps, you can create a durable and aesthetically pleasing driveway that will stand the test of time. Whether you choose to tackle the project yourself or enlist the help of experienced contractors, investing time and effort into each phase will pay off with many years of reliable service and curb appeal.
Discover more from The Cameron Journal
Subscribe to get the latest posts sent to your email.